
Now that I've got some of the game elements I want in the game sorted I've begun to think about how the game will flow and how the player will need to be informed of what to do at every stage. At the start, the player needs to search around for anything they can find, which will eventually culminate in the player gaining access to the cave systems. They will be told before they start that Sooty and Goerge's father have gone missing and need to search for clues. Each object that can be interacted with will highlight the A button on the interface, a simple way for the player to see that they can interact. With the correct order of interations, a box will be opened leading on to the next area.
The next area is the cave systems where the player needs to find their way to the exit of the cavern. On the way there will be traps and "mini puzzles" such as crouching under objects, jumping over them and pulling levers.
Friday 21 November 2008
Friday 24 October 2008
MIPS Programming
This week I've been working through some exercises in MIPS, namely the ones over at http://chortle.ccsu.edu/AssemblyTutorial/index.html#part1. I've been tackling some very simple problems mainly using MIPS's arithmetic functions such as add and logical operations like shift left and "or". This is some code I wrote for the first exercise of chapter 13.
All this does is perform the calculation 456 - 229 + 325 - 552. At the start, ori is used to perform an or operation between $0 (which contains 0 always) and 456. The result of doing this is that it always stored the value you provide in the register specified. I could have also just added 456 to register $0 but that's boring :)
This is an extract from the third exercise of chapter 13.
This stores the value 0x7000 (28672) in register $9, then shifts the bits 16 places to the left. This has the same function as multiplying it by 2^16. It then finally adds itself to itself. The interesting thing here is that the add performed is an unsigned addition. This means that if it overflow, it doesn't trap the program. In this case, using add would cause an overflow since the value being stored, as a two's compliment, would be negative.
The rest of exercise 13 is pretty self explanatory too. The more interesting stuff was to be found in exercise 15. Here's what I wrote for exercise 1.
I decided to make the effort to comment this one since it's a bit more complex and a little confusing looking at it all at once. The interesting thing here is the usage of memory. At the bottom I've defined a variable called x and a variable called poly. Both of these are words (4bytes) in memory. MARS (the program I'm using to emulate MIPS) uses 0x10010000 as its memory base. So basically, x is stored at 0x10010000 and poly is stored at 0x10010004, since it is 4 bytes further in, and memory addresses refer to specific bytes. The lui command is then used to store a memory address (0x1001) in a register. Clearly it is impossible to fit a 32bit address into a 32bit instruction which also has the instruction itself. Therefore, only 0x1001 is stored, and the rest is accessed with offsets. That can be see in the load word function.
This loads a word of data from the memory address in register $7 into register $8. The offset is stored in the value before the bracket. For x, there is obviously no offset needed, but poly is 4 bytes in so an offset of 4 is provided.
Finally, this is my code for exercise 4 which is the most interesting off all, enabling you to calculate a polynomial in the form ax^3 + bx^2 + cx + d by entering values into memory.
The code is nothing particularly different from the code shown so far. One thing to note though, is that b cannot be used as a label for the memory as it is a command. So I just used b2.
main:
 ori $1, $0, 456
 addi $1, $1, -229
 addi $1, $1, 325
 addi $1, $1, -552
All this does is perform the calculation 456 - 229 + 325 - 552. At the start, ori is used to perform an or operation between $0 (which contains 0 always) and 456. The result of doing this is that it always stored the value you provide in the register specified. I could have also just added 456 to register $0 but that's boring :)
This is an extract from the third exercise of chapter 13.
main:
ori $9, $0, 0x7000
sll $9, $9, 16
addu $9, $9, $9
This stores the value 0x7000 (28672) in register $9, then shifts the bits 16 places to the left. This has the same function as multiplying it by 2^16. It then finally adds itself to itself. The interesting thing here is that the add performed is an unsigned addition. This means that if it overflow, it doesn't trap the program. In this case, using add would cause an overflow since the value being stored, as a two's compliment, would be negative.
The rest of exercise 13 is pretty self explanatory too. The more interesting stuff was to be found in exercise 15. Here's what I wrote for exercise 1.
main:

#Program to calculate 3x^2 + 5x - 12

#6 : Store coefficients
#7 : Memory address of x
#8 : x
#10: Final result
#11: Accumulator

#Set the position of x in memory
lui $7, 0x1001

#Load x and poly
lw $8, 0($7)

#Square x and store result in $10
multu $8, $8
mflo $10
sll $0, $0, 0

#Multiply result by 3
ori $6, $0, 3
multu $10, $6
mflo $10
sll $0, $0, 0

#Store 5x in $11
ori $6, $0, 5
multu $8, $6
mflo $11

#Subtract $11 from $10
sub $10, $10, $11

#Subtract a further 12
addi $10, $10, -12

#Store result as poly
sw $10, 4($7)

.data
x: .word 7
poly: .word 0
I decided to make the effort to comment this one since it's a bit more complex and a little confusing looking at it all at once. The interesting thing here is the usage of memory. At the bottom I've defined a variable called x and a variable called poly. Both of these are words (4bytes) in memory. MARS (the program I'm using to emulate MIPS) uses 0x10010000 as its memory base. So basically, x is stored at 0x10010000 and poly is stored at 0x10010004, since it is 4 bytes further in, and memory addresses refer to specific bytes. The lui command is then used to store a memory address (0x1001) in a register. Clearly it is impossible to fit a 32bit address into a 32bit instruction which also has the instruction itself. Therefore, only 0x1001 is stored, and the rest is accessed with offsets. That can be see in the load word function.
lw $8, 0($7) #Load x
lw $8, 4($7) #Load poly
This loads a word of data from the memory address in register $7 into register $8. The offset is stored in the value before the bracket. For x, there is obviously no offset needed, but poly is 4 bytes in so an offset of 4 is provided.
Finally, this is my code for exercise 4 which is the most interesting off all, enabling you to calculate a polynomial in the form ax^3 + bx^2 + cx + d by entering values into memory.
#Program to calculate ax^3 - bx^2 + cx + 2

#6 : Coefficients
#7 : Memory address of x
#8 : x
#10: Final result
#11: Accumulator
#13: a
#14: b
#15: c
#16: d

#Set the position of x in memory
 lui  $7,  0x1001

#Load x, a, b, c, d
 lw   $8,  0($7)   #x
 lw   $13,  8($7)   #a
 lw   $14,  12($7)   #b
 lw   $15,  0x10($7)  #c
 lw   $16,  0x14($7)  #d

#ax
 mult  $13,  $8
 mflo  $10

#ax + b
 addu  $10,  $10,  $14

#ax^2 + bx
 mult  $10, $8
 mflo  $10

#ax^2 + bx + c
 addu  $10,  $10,  $15

#ax^3 + bx^2 + cx
 multu  $10,  $8
 mflo  $10

#ax^3 + bx^2 + cx + d
 addu  $10,  $10,  $16

#Store result as answer
 sw   $10,  4($7)

.data
 x:   .word 10
 answer: .word 0
 a:   .word 4
 b2:  .word 3
 c:   .word 2
 d:   .word 1
The code is nothing particularly different from the code shown so far. One thing to note though, is that b cannot be used as a label for the memory as it is a command. So I just used b2.
Wednesday 22 October 2008
Matrices
My work this week has been on the Matrix class for my software renderer. Much like the Vector class, it currently has most of the basic functions for Matrix arithmetic as well as building matrices. However it is missing functionality for creating view and projection matrices which will be added soon and give me the ability to draw some nice perspective 3d graphics from some basic vectors with GDI.
I've also created a static variable within the class to hold the identity matrix which will come in useful creating matrices from it. As to be expected there's also a method to output a string to console of the value of the Matrix.
I've also created a static variable within the class to hold the identity matrix which will come in useful creating matrices from it. As to be expected there's also a method to output a string to console of the value of the Matrix.
Wednesday 15 October 2008
MIPS Research
For my work this week I’ve been looking into MIPS programming and its implementation. Due to difficulties acquiring a Playstation disk image though, I’ve used an N64 image which shares the MIPS architecture so is therefore relevant. Using a program called N64 Disassembler (inventive eh?) I’ve disassembled a Carmageddon Rom to give me the entire set of instructions used in the game.
MIPS?
MIPS is a 32bit RISC instruction set which has been in use since 1985 and finds a home nowadays in many simple devices, such as microwaves. It was used in the Playstation 1, 2 and Portable. Over the years, many revisions have been made, with the latest being MIPS32, and MIPS64, a 64bit version of MIPS for more modern applications.
Analysing a few lines of MIPS assembley
This piece of code was ripped from the top of the Carmageddon Rom.
The first line is an “Or Immediate” function, which performs a bitwise or test between rs28 and “0x4012=16402” which acts like a constant, and stores the result in rt 0. I haven’t been able to find what “0x4012=16402” would refer to, but it is a 16bit value since “ori” is an I-Type function. (UPDATE: I'm amazed I didn't realise this before, but what this is actually doing is storing the hexadecimal value 0x4012 in register rt 0. The 16402 is just the value of 0x4012 in decimal) The different types are like so:
R-Type and I-Type are used for most functions, all arithmetic being R. J is used for only 2 functions, both to do with jumping to instructions.
The second line represents a bit-wise shift in the register “rd 1” of 28 which is stored in register “rt 0”. Basically this moves all the bits 1 to the left. Providing no 1’s were lost off the end in the process, this can be used to perform extremely cheap x2 calculations. For example, 0100 which is 4 in decimal would become 1000 which is 8 in decimal, hence x2. With 28 shifts it would be the same as multiplying by 2^28 (once again, providing no 1’s are lost, in which case the calculation is destroyed).
The third line indicated a “Move from HI” operation. This is a special register used by MIPS when calculating complex arithmetic. After a multiplication, a 64bit return value is stored between the 2 32bit registers, and after a division, the result is stored in LO with the remainder stored in HI. As you would imagine, there is also a “Move from LO” operation which moves a value from the LO register to another register.
Jumping
Jumping to memory address for instructions is done with the “j” function. It simply takes a memory address where the next instruction is, and goes there AFTER the next instruction is executed. For this reason, the command sll rd 0, rt 0, 0 is used. This basically performs a left bitwise shift on register 0 by 0 and storing the result in 0. This does absolutely nothing, as the 0th register in MIPS is reserved as a 32bit 0 value, so nothing can change it. The operation is referred to as a NO-OP, which literally means no operation. Now the program jumps up to the specified instruction in the “j” command.
References
http://chortle.ccsu.edu/AssemblyTutorial/index.html#part1 - Detailed information regarding MIPS assembley programming
http://en.wikipedia.org/wiki/MIPS_architecture - Overview, as well as instruction codes
http://www.zophar.net/utilities/n64dev.html - N64 / PS1 disassembler
MIPS?
MIPS is a 32bit RISC instruction set which has been in use since 1985 and finds a home nowadays in many simple devices, such as microwaves. It was used in the Playstation 1, 2 and Portable. Over the years, many revisions have been made, with the latest being MIPS32, and MIPS64, a 64bit version of MIPS for more modern applications.
Analysing a few lines of MIPS assembley
This piece of code was ripped from the top of the Carmageddon Rom.
0x0:   ori rt 0, rs 28, 0x4012=16402
0x4:   sll rd 1, rt 0, 28
0x8:   mfhi rd 0
The first line is an “Or Immediate” function, which performs a bitwise or test between rs28 and “0x4012=16402” which acts like a constant, and stores the result in rt 0. I haven’t been able to find what “0x4012=16402” would refer to, but it is a 16bit value since “ori” is an I-Type function. (UPDATE: I'm amazed I didn't realise this before, but what this is actually doing is storing the hexadecimal value 0x4012 in register rt 0. The 16402 is just the value of 0x4012 in decimal) The different types are like so:
R-Type    6bit opcode, 5bit reg, 5bit reg, 5bit reg, 6bit function
I-Type    6bit opcode, 16bit Immediate Value (constant)
J-Type    6bit opcode, 26bit address
R-Type and I-Type are used for most functions, all arithmetic being R. J is used for only 2 functions, both to do with jumping to instructions.
The second line represents a bit-wise shift in the register “rd 1” of 28 which is stored in register “rt 0”. Basically this moves all the bits 1 to the left. Providing no 1’s were lost off the end in the process, this can be used to perform extremely cheap x2 calculations. For example, 0100 which is 4 in decimal would become 1000 which is 8 in decimal, hence x2. With 28 shifts it would be the same as multiplying by 2^28 (once again, providing no 1’s are lost, in which case the calculation is destroyed).
The third line indicated a “Move from HI” operation. This is a special register used by MIPS when calculating complex arithmetic. After a multiplication, a 64bit return value is stored between the 2 32bit registers, and after a division, the result is stored in LO with the remainder stored in HI. As you would imagine, there is also a “Move from LO” operation which moves a value from the LO register to another register.
Jumping
Jumping to memory address for instructions is done with the “j” function. It simply takes a memory address where the next instruction is, and goes there AFTER the next instruction is executed. For this reason, the command sll rd 0, rt 0, 0 is used. This basically performs a left bitwise shift on register 0 by 0 and storing the result in 0. This does absolutely nothing, as the 0th register in MIPS is reserved as a 32bit 0 value, so nothing can change it. The operation is referred to as a NO-OP, which literally means no operation. Now the program jumps up to the specified instruction in the “j” command.
References
http://chortle.ccsu.edu/AssemblyTutorial/index.html#part1 - Detailed information regarding MIPS assembley programming
http://en.wikipedia.org/wiki/MIPS_architecture - Overview, as well as instruction codes
http://www.zophar.net/utilities/n64dev.html - N64 / PS1 disassembler
Sainsbury's Unreal Level - Almost done
As the title of this post would indicate, my work on my part of the collaberative unreal project has almost been finished. I've added a large amount of stuff since the last post, and although technically there is a lot more to do, it is at a stage where it is of a decent enough standard.
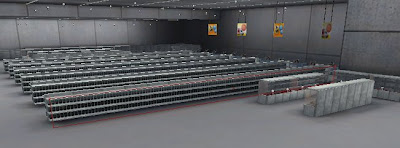
This is an overview of the shop. It is taken from the bakery section. The number of tills and aisles is slightly inaccurate, but pretty much correct.
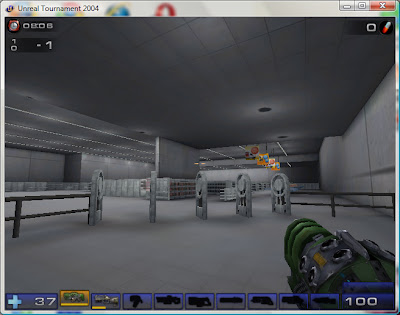
This shot is taken from the entrance, you can see the security barriers I made with CSG and turned into a static mesh to duplicate.
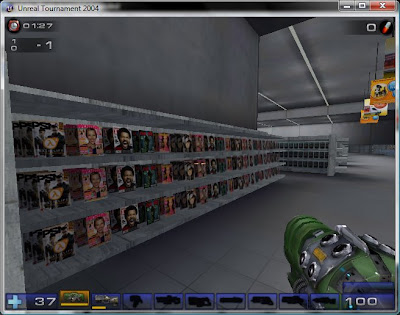
This is a magazine rack. It uses shelves I made with CSG and a simple magazine texture I made in Photoshop, and saved as a Targa to use transparency to give the effect of there being many magazines when in reality it is just 1 plane with a single texture over the top. However, in this case, there are 3 to give the illusion of there being several magazines behind each other. This is still extremely cheap to do, but the overall look is surprisingly effective.


These next 3 shots show off more detailed views of the shelves, as well as the chilled food section which has gibs to make up the meat :) Overall I'm impressed with what I've been able to achieve so far, and some things I've learnt will be invaluable later. Creating the transparent textures was awkward at first as they can't be used like PNG's, but now I've done them they're extremely simple.
This is an overview of the shop. It is taken from the bakery section. The number of tills and aisles is slightly inaccurate, but pretty much correct.
This shot is taken from the entrance, you can see the security barriers I made with CSG and turned into a static mesh to duplicate.
This is a magazine rack. It uses shelves I made with CSG and a simple magazine texture I made in Photoshop, and saved as a Targa to use transparency to give the effect of there being many magazines when in reality it is just 1 plane with a single texture over the top. However, in this case, there are 3 to give the illusion of there being several magazines behind each other. This is still extremely cheap to do, but the overall look is surprisingly effective.


These next 3 shots show off more detailed views of the shelves, as well as the chilled food section which has gibs to make up the meat :) Overall I'm impressed with what I've been able to achieve so far, and some things I've learnt will be invaluable later. Creating the transparent textures was awkward at first as they can't be used like PNG's, but now I've done them they're extremely simple.
Sunday 12 October 2008
Collaberative Unreal Project
This week we've been assigned the rather epic task of making the whole of the Westfield Centre, in the centre of Derby, in Unreal Tournament 2004. We've split it up into 4 different sections; upstairs, downstairs, the cinema and the market. I'm in the downstairs group which has involved some work with the upstairs lot to make sure that the main area of the centre will be correctly scaled and such. I'm personally working on reproducing Sainsburys, which I was happy to do as it's probably the shop I know most (or know at all for that matter). My first bit of work on it has been getting the scale right, which I think I just about have though it can be hard to tell. I've also produced the entrance with the security barriers and railings.

I think that they've come out quite well. I designed them by originally using CSG and then converting them to a static mesh, which are a lot more efficient for objects like this, and they don't have problems with holes and visibility. Next I'll be working on the tills and possibly shelves.
Vectors
My work this week has been on a Vector class for my software renderer. More functions will probably be added to do it as time goes on but now I have the basics, such as Dot Product, Cross Product, Normalisation and calculating the magnitude. I've also added operator overloads to compliment the operator functions (add, subtract, multiply and divide) which is easily done using:
I've done this for all the operators and also provided their +=/-= etc operators. Next up is Matrices which will give me the ability to transform a few test points into screen space, I hope!
With the vector class I also wrote a small test program to test every function to make sure it is working correctly. We also did a vector test during the tutorial which I think I did very well on.
Vector Vector::operator+(Vector rhs)
{
   return Vector(_x + rhs.x, _y + rhs._y, _z + rhs._z);
}
I've done this for all the operators and also provided their +=/-= etc operators. Next up is Matrices which will give me the ability to transform a few test points into screen space, I hope!
With the vector class I also wrote a small test program to test every function to make sure it is working correctly. We also did a vector test during the tutorial which I think I did very well on.
Subscribe to:
Posts (Atom)
About Me

- knighty
- I'm a computer games programming student currently studying at the University of Derby